User Tools
voice:grandstream_paging
This is an old revision of the document!
Table of Contents
Viking PA-2A Paging System Integration
General Info: http://wiki.ipitomy.com/wiki/Overhead_Paging
More General Info: http://www.voip-info.org/wiki/view/Asterisk+Paging+and+Intercom
Using an ATA (FXS): http://www.asteriskpbxsystems.com/asterisktopaging.html
FreePBX: http://wiki.freepbx.org/display/FOP/Using+an+SPA3102+FXO+Port+to+connect+with+Valcom+Paging+units
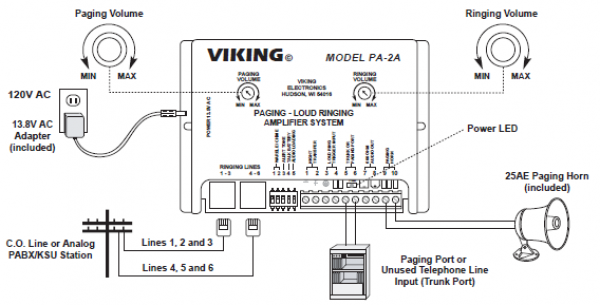
Viking PA-2A
https://www.vikingelectronics.com/product-details.php?pid=317
- Adjust the paging volume knob on the Viking PA-2A to a middle position (not off)
- Connect an FXO port to the Viking PA-2A using screw terminals 5 & 6 (Trunk or Paging Port)
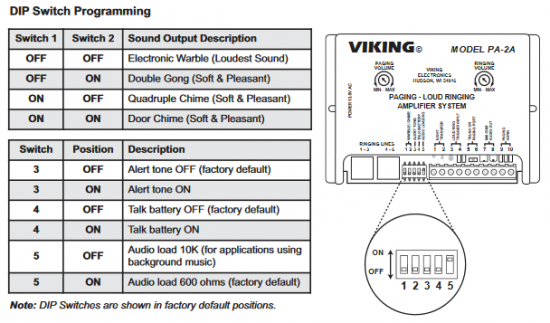
- Set the DIP switches to 4 & 5 to ON (the rest off)
FreePBX and Linksys SPA-3102
The Cisco/Linksys SPA-3102 is a multi-function ATA with one FXS and one FXO port (LINE). We can use the FXO port to drive a separate paging amplifier.
- Configure the Viking PA-2A as above
- Connect the FXO port to screw terminals 5 & 6 on the SPA-3102
- Connect the speaker horn to screw terminals 9 & 10 on the SPA-3102
Grandstream UCM610X PBX
- Use an FXO port on the Grandstream UCM610X PBX
- Turn ON
Talk Batteryfeature of paging amp- DIP switch 4 ON for Viking PA-2A
- Create a new Analog Trunk named
Paging - Create a new Outbound Route also named
Paging- Set the Trunk to
Paging - Set the Dial Pattern to
999 - Strip the digits used to access the trunk or you will hear the dialed tones when paging
![]() Evidently, on the Grandstream PBX, you can not strip all the digits as the PBX won't let you enter
Evidently, on the Grandstream PBX, you can not strip all the digits as the PBX won't let you enter 3 to strip out the tones for 999.
voice/grandstream_paging.1635455296.txt.gz · Last modified: 2021/10/28 15:08 by gcooper


