User Tools
This is an old revision of the document!
Proxmox Virtualization Environment
![]()
Main: http://www.proxmox.com/products/proxmox-ve
Wiki: http://pve.proxmox.com/wiki/Documentation
Forums: http://forum.proxmox.com/forum.php
Proxmox VE is a 64-bit, free, open-source, bare-metal virtualization platform (hypervisor).
Proxmox VE provides two virtualization technologies in one platform:
- OpenVZ Containers
- Linux KVM
KVM requires hardware (CPU+mainboard) virtualization support.
Administration
https:<ipaddress>:8006
—-
 All very old below this point!
===== Updating and Upgrading =====
<file>
apt-get update
apt-get dist-upgrade
</file>
===== PVE Host Networking =====
If you set a static IP address for the PVE host using the web interface post-installation, you may find the wrong IP address shown at the SSH login prompt. Edit /etc/hosts to fix:
<file>
nano /etc/hosts
reboot
</file>
===== Quickie Performance Test =====
On the Hardware Node (HN):
<file>
pveperf
</file>
===== Proxmox VE 2.x With Software RAID =====
http://www.howtoforge.com/proxmox-2-with-software-raid
===== KVM =====
http://c-nergy.be/blog/?p=1004
http://www.linux-kvm.org/page/Main_Page
KVM provides for full virtualization and is built into the Linux kernel. It's supported by Redhat, Ubuntu and other distributions.
==== Live Migration ====
All very old below this point!
===== Updating and Upgrading =====
<file>
apt-get update
apt-get dist-upgrade
</file>
===== PVE Host Networking =====
If you set a static IP address for the PVE host using the web interface post-installation, you may find the wrong IP address shown at the SSH login prompt. Edit /etc/hosts to fix:
<file>
nano /etc/hosts
reboot
</file>
===== Quickie Performance Test =====
On the Hardware Node (HN):
<file>
pveperf
</file>
===== Proxmox VE 2.x With Software RAID =====
http://www.howtoforge.com/proxmox-2-with-software-raid
===== KVM =====
http://c-nergy.be/blog/?p=1004
http://www.linux-kvm.org/page/Main_Page
KVM provides for full virtualization and is built into the Linux kernel. It's supported by Redhat, Ubuntu and other distributions.
==== Live Migration ====
![]() Live migration with KVM requires that you store your VM data on NAS/SAN or DRBD.
==== Disk Image Format ====
* Raw
* Better performance than qcow2
* The full size will be provisioned on the proxmox host server (thick provisioning)
* QCOW
* Supports snapshots
* The full size will not be provisioned at first (thin provisioning)
* Can use copy on write technology
* VMDK
* Supports thin provisioning
* More compatible with VMware
==== VirtIO ====
* KVM guest drivers are built into many Linux distributions.
* http://wiki.libvirt.org/page/Virtio
* KVM Windows guest drivers are updated frequently and readily available:
* http://www.linux-kvm.org/page/WindowsGuestDrivers/Download_Drivers
* http://alt.fedoraproject.org/pub/alt/virtio-win/latest/images/bin/
===== OpenVZ =====
http://wiki.openvz.org/Main_Page
http://pve.proxmox.com/wiki/OpenVZ_Console
OpenVZ Containers work differently than KVM, VMware or Xen technologies:
* Uses the same Linux kernel that's running on the host machine
* Probably provides the fastest virtualization
* Has near-zero overhead
* Only works for Linux guests
==== CentOS 5 Container (VM) ====
When you first create a CentOS 5 VM, you must reconfigure a few things:
From the PVE host CLI, we enter the VM:
<file>
vzctl enter CTID #next steps are all now inside the VM
</file>
Enable Proxmox CT console so we can access it from the web management interface:
<file>
vim /etc/inittab
</file>
Add the following line and reboot:
<file>
1:2345:respawn:/sbin/agetty tty1 38400 linux
</file>
==== CentOS 6 Container (VM) ====
When you first create a CentOS 6 VM, you must reconfigure a few things:
From the PVE host CLI, we enter the VM:
<file>
vzctl enter CTID #next steps are all now inside the VM
</file>
Enable Proxmox CT console so we can access it from the web management interface:
<file>
vim /etc/init/tty.conf
# This service maintains a getty on tty1 from the point the system is
# started until it is shut down again.
start on stopped rc RUNLEVEL=[2345]
stop on runlevel [!2345]
respawn
exec /sbin/agetty -8 tty1 38400
</file>
Then reboot the VM.
===== Networking =====
Differences Between
Live migration with KVM requires that you store your VM data on NAS/SAN or DRBD.
==== Disk Image Format ====
* Raw
* Better performance than qcow2
* The full size will be provisioned on the proxmox host server (thick provisioning)
* QCOW
* Supports snapshots
* The full size will not be provisioned at first (thin provisioning)
* Can use copy on write technology
* VMDK
* Supports thin provisioning
* More compatible with VMware
==== VirtIO ====
* KVM guest drivers are built into many Linux distributions.
* http://wiki.libvirt.org/page/Virtio
* KVM Windows guest drivers are updated frequently and readily available:
* http://www.linux-kvm.org/page/WindowsGuestDrivers/Download_Drivers
* http://alt.fedoraproject.org/pub/alt/virtio-win/latest/images/bin/
===== OpenVZ =====
http://wiki.openvz.org/Main_Page
http://pve.proxmox.com/wiki/OpenVZ_Console
OpenVZ Containers work differently than KVM, VMware or Xen technologies:
* Uses the same Linux kernel that's running on the host machine
* Probably provides the fastest virtualization
* Has near-zero overhead
* Only works for Linux guests
==== CentOS 5 Container (VM) ====
When you first create a CentOS 5 VM, you must reconfigure a few things:
From the PVE host CLI, we enter the VM:
<file>
vzctl enter CTID #next steps are all now inside the VM
</file>
Enable Proxmox CT console so we can access it from the web management interface:
<file>
vim /etc/inittab
</file>
Add the following line and reboot:
<file>
1:2345:respawn:/sbin/agetty tty1 38400 linux
</file>
==== CentOS 6 Container (VM) ====
When you first create a CentOS 6 VM, you must reconfigure a few things:
From the PVE host CLI, we enter the VM:
<file>
vzctl enter CTID #next steps are all now inside the VM
</file>
Enable Proxmox CT console so we can access it from the web management interface:
<file>
vim /etc/init/tty.conf
# This service maintains a getty on tty1 from the point the system is
# started until it is shut down again.
start on stopped rc RUNLEVEL=[2345]
stop on runlevel [!2345]
respawn
exec /sbin/agetty -8 tty1 38400
</file>
Then reboot the VM.
===== Networking =====
Differences Between venet and veth: http://wiki.openvz.org/Differences_between_venet_and_veth
Detailed veth Networking Info: http://forum.openvz.org/index.php?t=msg&&th=6191&goto=36869#msg_36869
venet Docs: http://openvz.org/Virtual_network_device
veth Docs: http://openvz.org/Virtual_Ethernet_device
* Proxmox VE uses a bridged networking model
* All VMs can share one bridge as if virtual network cables from each guest were all plugged into the same switch
* For connecting VMs to the outside world, bridges are attached to physical network cards and assigned a TCP/IP configuration
* VLANs (IEEE 802.1q) and network bonding/aggregation are possible with KVM
==== venet ====
* Networking configuration is assigned by OpenVZ admin
* Possibly more secure since VM owners can't set the IP addresses
* Possibly faster than veth
==== veth ====
* More like regular Linux networking
* Networking configuration is assigned by VM owner
* Has MAC address to support more networking configurations
* Used to get an IP address from your DHCP server
* Works with a pair of interfaces connected together
* One in the host OS (host node, container zero, HN, CT0) and the other in the CT (container)
* Packets sent to the HN interface come out in the CT
==== Multiple NICs for OpenVZ Containers ====
http://forum.proxmox.com/threads/3442-Multiple-NICs-for-OpenVZ-containers
=== venet ===
* You can assign multiple IP addresses
* Just add them after you created the container (separated with spaces) using the GUI
=== veth ===
* Use the CLI
* See 'man vzctl'
===== Java VNC Console =====
If you have problems using the VNC Console links, verify that you have Sun/Oracle Java installed.
It seems to work fine with Java 6 or Java 7.
See also Fedora 16 Notes.
===== Backup =====
http://pve.proxmox.com/wiki/Backup_and_Restore
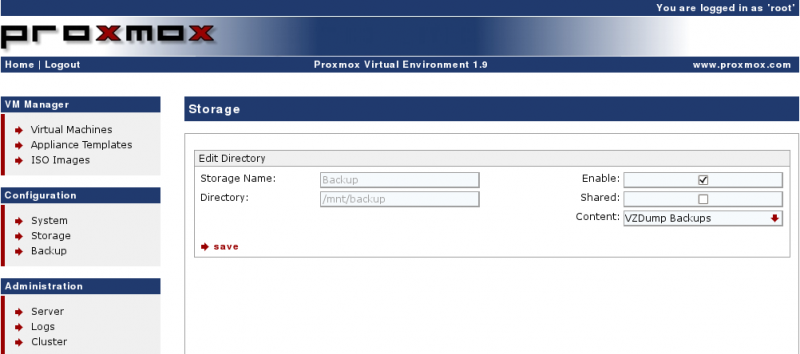
If you want to back up to and additional hard drive in your Proxmox server, you'll want to prep it and mount it manually. Then you can configure the backup in the web interface.
==== Prep the Disk ====
Create one large partition on the extra disk and create a filesystem. After that, create a mount point and create an entry in /etc/fstab. Finally, configure the directory /backup in the storage-gui.
<file>
fdisk -l
fdisk /dev/sdd
mkfs.ext3 /dev/sdd1
mkdir /mnt/backup
blkid
</file>
Edit /etc/fstab and add:
<file>
vim /etc/fstab
# Mount sdd1 as backup storage using the UUID
UUID=549b77bf-be9a-4bed-b56f-ab360004717c /mnt/backup ext3 defaults,noatime 0 0
</file>
<file>
mount -a
mount
/dev/sdd1 on /mnt/backup type ext3 (rw,noatime)
</file>
==== Configure the Storage ====
Configuration → Storage → Add Directory
 ==== Configure the Backup Job ====
Configuration → Backup → Create New Job
==== Configure the Backup Job ====
Configuration → Backup → Create New Job
 ===== DAHDI =====
See DAHDI.
http://nerdvittles.com/?p=645
==== PBX on Proxmox/OpenVZ Notes ====
* Use 64-bit hardware
* Use 64-bit Proxmox
* Use 64-bit guests
* Install DAHDI on Proxmox Host Node (HN)
* Pass through the DAHDI devices to the PBX guests
* Provides timing to (Asterisk) guest containers (CT)
==== Install DAHDI on the Proxmox (OpenVZ) Host ====
<file>
apt-get -y update
apt-get -y install build-essential make libncurses5-dev libcurl3-dev libiksemel-dev pve-headers-`uname -r`
cd /usr/src/
wget http://downloads.digium.com/pub/telephony/dahdi-linux-complete/dahdi-linux-complete-current.tar.gz
tar zxfv dahdi-linux-complete-current.tar.gz
cd dahdi-linux-complete<tab>
make all
make install
make config
</file>
Edit
===== DAHDI =====
See DAHDI.
http://nerdvittles.com/?p=645
==== PBX on Proxmox/OpenVZ Notes ====
* Use 64-bit hardware
* Use 64-bit Proxmox
* Use 64-bit guests
* Install DAHDI on Proxmox Host Node (HN)
* Pass through the DAHDI devices to the PBX guests
* Provides timing to (Asterisk) guest containers (CT)
==== Install DAHDI on the Proxmox (OpenVZ) Host ====
<file>
apt-get -y update
apt-get -y install build-essential make libncurses5-dev libcurl3-dev libiksemel-dev pve-headers-`uname -r`
cd /usr/src/
wget http://downloads.digium.com/pub/telephony/dahdi-linux-complete/dahdi-linux-complete-current.tar.gz
tar zxfv dahdi-linux-complete-current.tar.gz
cd dahdi-linux-complete<tab>
make all
make install
make config
</file>
Edit /etc/dahdi/modules and comment out all modules unless you need them:
<file>
nano /etc/dahdi/modules
modprobe dahdi_dummy
</file>
==== Enable DAHDI Timing in Guest Containers ====
<file>
amportal restart
</file>
===== Storage =====
http://pve.proxmox.com/wiki/Storage_Model
Supported storage technologies:
* Local storage (mandatory)
* iSCSI
* FC
* NFS
==== Shared Storage ====
* In order to use live migration, all virtual disks needs to be stored on SAN, NAS or DRBD storage
* OpenVZ containers must be on local storage or NFS
* OpenVZ live migration works on NFS or local storage
==== iSCSI ====
See also napp-it ZFS Storage Server.
=== LVM Groups with Network Backing ===
http://pve.proxmox.com/wiki/Storage_Model#LVM_Groups_with_Network_Backing
In this configuration, network block devices (iSCSI targets) are used as the physical volumes for LVM logical volume storage. This is a two step procedure and can be fully configured via the web interface.
- Add the iSCSI target
- On some iSCSI targets you need to add the IQN of the Proxmox VE server to allow access
- Click Add iSCSI Target on the Storage list
- As storage name use whatever you want but take care, this name cannot be changed later
- Give the 'Portal' IP address or servername and scan for unused targets
- Disable use LUNs direcly
- Click save
- Add LVM group on this target
- Click Add LVM Group on the Storage list
- As storage name use whatever you want but take care, this name cannot be changed later
- For Base Storage, use the drop down menu to select the previously defined iSCSI target
- For Base Volume select a LUN
- For Volume Group Name give a unique name (this name cannot be changed later)
- Enable shared use (recommended)
- Click Save
===== Clustering =====
http://pve.proxmox.com/wiki/Proxmox_VE_2.0_Cluster
http://pve.proxmox.com/wiki/High_Availability_Cluster
http://pve.proxmox.com/wiki/Two-Node_High_Availability_Cluster
http://188.165.151.221/threads/9041-Advice-on-Shared-Storage-for-Proxmox-Cluster
http://pve.proxmox.com/wiki/Intel_Modular_Server_HA
* Proxmox cluster does not need a dedicated management node
* You can connect to the web interface of any node to manage the entire cluster
* If a virtual machine or container (VM or CT) is configured as HA and the physical host fails, the VM is automatically restarted on one of the remaining Proxmox VE Cluster nodes
===== User Management =====
http://pve.proxmox.com/wiki/User_Management
==== Authentication ====
http://c-nergy.be/blog/?p=2501
==== Management ====
http://c-nergy.be/blog/?p=2588
===== Templates =====
==== TurnKey OpenVZ Templates ====
http://c-nergy.be/blog/?p=2570
http://www.turnkeylinux.org/blog/openvz-proxmox
===== Troubleshooting =====
Many command line tips here: http://forum.proxmox.com/archive/index.php/t-8624.html
==== Leftover VM from Failed CT Creation ====
Try logging into the PVE host and deleting the configuration file of the problem CT:
<file>
rm /etc/pve/nodes/pve1/openvz/1000.conf
</file>
