Table of Contents
Grandstream UCM Vitelity Trunk
See also Grandstream UCM6100 Series IP-PBX
See also Grandstream Phone Provisioning Notes
See also Vitelity SIP Service
This is almost certainly not the only way to configure a Vitelity SIP trunk with a Grandstream UCM PBX.
Register or Route
UCM → System Settings → Network Settings → Basic Settings → Method → Switch
Registration
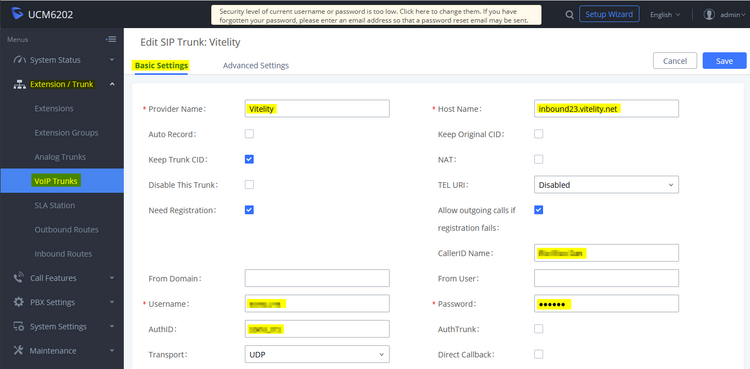
![]() We use sip23.vitelity.net for registration.
We use sip23.vitelity.net for registration.
![]() You probably do not want or need any port forwarding when using a registration SIP account.
You probably do not want or need any port forwarding when using a registration SIP account.
![]() For registration accounts, choose Register SIP Trunk as the Type when creating a new trunk.
For registration accounts, choose Register SIP Trunk as the Type when creating a new trunk.
IP Routed
![]() For IP routed accounts, choose Peer SIP Trunk as the Type when creating a new trunk.
For IP routed accounts, choose Peer SIP Trunk as the Type when creating a new trunk.
![]() You probably need port forwarding when using a IP routed SIP account with a PBX behind NAT.
You probably need port forwarding when using a IP routed SIP account with a PBX behind NAT.
![]() Best security is attained by limiting the port forwarding to a list of Vitelity servers.
Best security is attained by limiting the port forwarding to a list of Vitelity servers.
These are the likely ports you need to forward into your PBX:
| Protocol | Ports |
| UDP | 5060-5061,10000-20000 |
Note that these are just the most common ports forwarded to PBXs. Depending on your reality, you may need to change these port numbers.
Trunk Configuration
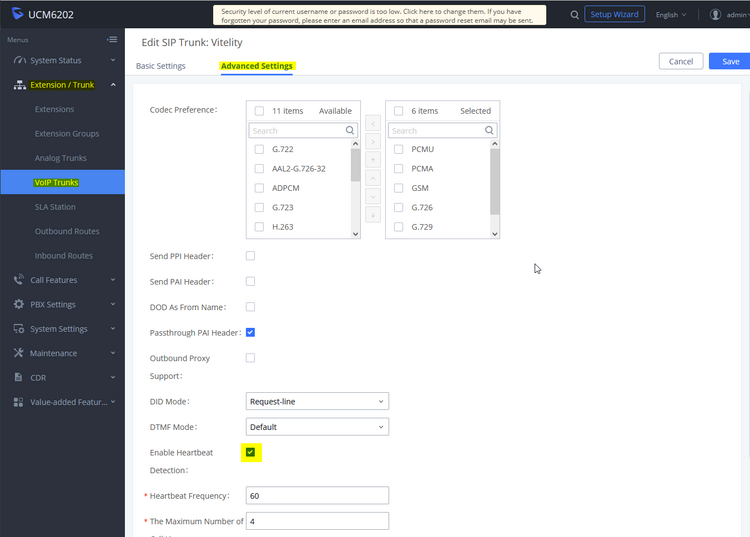
![]() After saving the basic trunk definition, edit Advanced Settings and select Enable Heartbeat Detection to monitor registration status (qualify).
After saving the basic trunk definition, edit Advanced Settings and select Enable Heartbeat Detection to monitor registration status (qualify).
![]() While editing Advanced Settings, you should set the Maximum Number of Call Lines to limit exposure if hacked. You might set it to your estimate of the anticipated maximum number of simultaneous calls.
While editing Advanced Settings, you should set the Maximum Number of Call Lines to limit exposure if hacked. You might set it to your estimate of the anticipated maximum number of simultaneous calls.


